Every Child is Gifted, They Just Unwrap their gifts at different times. -Unknown

Saturday, August 17, 2013

Chevron Nameplates

I have finished decorating my classroom.  Now on to getting ready for Monday- the first day of school.  Open house was great.  I got to meet several of my students.  They also found their new desk.  On each desk I have laminated and hot glued their nameplates. These are my nameplates that I made for my classroom.  They are in my teachers pay teachers store.


Happy, Happy, Happy last weekend before school.
Leah
 

Monday, July 8, 2013

Cami's 6th Birthday and a new bow holder

So, my daughter, Cami, came to me today and asked-mom are you finished making that? I told her Almost. She came back 15 min later and said, oh man now what are you making?!  Evidently I have been making, crafting, or playing a bit too much for her.

Last week, Cami turned 6. I started a tradition with my kids- birthday breakfast. They get to pick what they want to eat the next morning. After they go to bed, I decorate the kitchen for the next morning.  When they wake up, it is their own special celebration. We can even do this on school mornings. 

This year Cami is very much into Barbie dolls.  She told me she wanted tons of them for her birthday. So to decorate for her birthday breakfast, out came my Cameo.  


I downloaded a girl silhouette with a ponytail from the Cameo Slhouett online store.  Then sized it, and cut one out of vinyl to put on the table cloth and others out of pink and black card stock to place on the table.  The vinyl silver polka dots were left over from another project.  


I also cut out the letters for Cami is 6 to hang from the ceiling. I took the out outline from the girl that was left over and put it on pink polka dot card stock. I used cute fuzzy pink yarn to hang it with.  


Cami was very excited when she woke up. She loved eating rainbow sherbet for breakfast!  

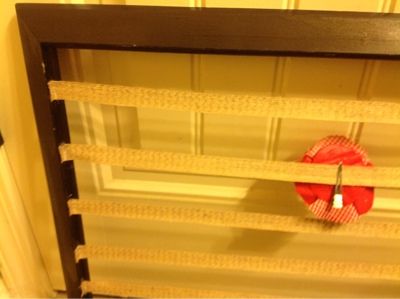
The next project was for the kids bathroom.  The girls have tons of hair bows, since I changed up the decor, I decided we were in need of a new bow holder.  I have collected several old frames over the years. 


To make this I painted the brown frame black, got out the hot glue gun, and chevron burlap ribbon.  I turned the frame over and hot glued the end of the ribbon to one side, mashed it down into the glue with scissors to make sure it has a good hold, after a few moments. I pulled the ribbon across and glued the other side. I made sure it was tight enought that it did not sag.  I continued for the other rows. It does not have to be perfect, as you can see below, because most of the time it is covered by bows.


This is with only one clipped on. 


This is the finished product. Can you tell, I enjoy making bows too! I think it may be time to go through the bows and only keep my favorite. 


My beautiful friend, Libbi married Jacob this past weekend.  She had two ring bearers.  She was asking us what to have the three year old carry.  Here comes the Pinterest- "Libbi have you seen the signs that say here comes your bride?" So after a quick trip to Joann's Fabrics to find a light weight piece of plywood, and more vinyl for my Cameo, and black paint- this is the sign he carried.  The little boy was so cute! It had black ribbon for him to hang it around his neck. He moved it back and forth, swung it, and wiggled it! Some could say he stole the show, but my beautiful 6 year old was the flower girl and she was a Perfect princess, and there was also a bride. I forgot to take a picture of the finished product.  Holes were drilled into the top, black ribbon slid through and knots were tied to hold it. to make it look cute on the opposite side, I tied a short piece of ribbon to it so it would look decorative also.  Congratulations Jacob and Libbi!  


This sign was from the Gorgeous bride, Katie, at Decorate my life. You can see more of her amazing DIY wedding on her blog!


Have a happy happy sunny July,
Leah


Tuesday, June 25, 2013

DIY in the summer!

Loving summertime! I am finally getting to do some of the things I pinned on Pinterest. The first thing I want to share is for my classroom. I started it around Christmas. I came up with it on my own.  I found several old cookies sheets that were being given away. I painted them with black chalkboard paint, cut the vinyl lettering with my Cameo using a Kevin and Amandan font, then added the fabric flowers and rosettes with my hot glue gun. The fabric is leftover from the curtains I made for my classroom. So it will look great in there.


My youngest daughter's birthday is this week. She continued to ask how long until her birthday, so I pulled this out.  She loves it.  We change the number everyday.

I also have had fun with my sewing machine.  I tell people I pretend to sew, because I just play on it.  
I made these pillows for outside. I my friend told me about a pin that she saw-
Outdoor pillows, the idea is to stuff them with plastic bags.  I like how they turned out. I think they may need a few more bags in them after sitting in the chairs and leaning on them.  I found the fabric at Walmart they had it on sale for $2 a yard.  

And, since I have used all my plastic bags, I decided to make a bag to hold all my bags that I will continue to collect from my trips to the store. 
 

There are tons of tutorials on Pinterest.  I did not use one.  I just looked at one my friend had made. Her's is adorable with several coordinating fabrics.  Since I just play on a sewing machine, mine is simple.  I sewed up a rectangle, hemmed the bottom and added elastic to it, hemmed the top, and added ribbon for the handle. I did not put elastic or a drawstring in the top, I may wish I had later. The fabric came from Hobby Lobby. It was leftover from the curtains I made last year for my kitchen. 

I had to take my laptop to the tech guys at school. They are getting me a different one in July sometime. So, the digital items I was planning on posting is going to have to wait. 

Happy summer!
Leah

Tuesday, June 18, 2013

Wall art with my Cameo

This past May, I was privileged to observe a literacy block at another school district. We learned about several common core resources. But like any teacher, what I wanted to bring to my room was things that she had used to decorate her room with! She had used several framed quotes and framed subway art.  I came home and searched Pinterest and Teachers pay Teachers.  I found some to add to my wish list.  Here are some from my wish list-Teaching-With-A-Touch-Of-Twang, subway classroom rules (free)- Crystal Dean, Bright Motivational Classroom Posters ($2.50)- Kindergarten Kapers, In Our Classroom Sign (free). On Pinterest, I fell in love with J & A and Company- Bathroom Printables and knew they would look adorable in my kids bathroom.  When it gets closer to school, I will print these and hang in my bathroom at school (free also).


I have several older frames that I had used to display my kids artwork in. I just repurposed them. I used my Cameo to create these that match the red shower curtain. 


I made bows and rosettes with burlap chevron ribbon from Hobby Lobby. The top is an old cookie sheet that I had spray painted black and had my kids footprints on.  I created this before I had my cameo, so the font is not as cute as Kevin and Amanda's. I love you all the way up to your toes, is from Guess How Much I Love You by Sam McBratney.

Happy happy summer,
Leah


Saturday, June 1, 2013

2012 Classroom

The first thing. I would like to share is my classroom for this past school year.  I had tons of fun redoing it.  I decided on chevron.  My inspiration was Rainbow Days Paper Borders  from  Graphics From the Pond.  You can purchase it by clicking on the link.  When I first started teaching I decorated my classroom in baseball, my husband's favorite sport therefor we had tons of stuff.  When my son was born, we put most of it in his nursery, so I changed it to polka dots. After several years of dots, I was ready for a classroom over haul.  No one else had Chevron.

  
The first thing I did was print off several of the rainbow chevron pages.  I then did a google search for another set of chevron digital papers.  I used Adobe PS to changed the color of the papers I found. I then cut the pennants with a large paper cutter.  My great friend Katie at Decorate my Life gave me this colorful yarn.  (Yarn is much cheaper than ribbon.) I hole punched the pennants and began to place them on in a random order.  I attached the yarn up with a dot of hot glue.  I liked it so much that I then printed off my student's names and my name to hang on the board in the hall.  I used the dye cut at school (I did not get a Silhouette Cameo until Christmas) and cut out the welcome letters.  I love the zig zag border from Trend, I found at our local teacher store.


They also had this adorable paper to match my new border.

     
At Big Lots I bought two sets of twin sheets to make curtains for window, hide the ugly shelf, and storage under the tables. 

 
 They also had this cute rug that I had to have. I used wrapping paper I found at target to create my vocabulary board. 

    Using the yarn, I hung several different colors of tissue puff balls above my table groups, class library and out in the hall. My boring bar stools also go a stripped make over. 

I fell in love with this quote that my wonderful friend shared with me.  Last year when Katie (who also gave me the yarn) was on my team I had her free hand it on my enormous cabinet with neon Expos. It is a great focal point!

 
My long time friend and former team teacher, Kim painted my favorite character The Pigeon for me.  You should visit her Etsy shop Sassey With Class to order one for you or your favorite teacher. 
Thanks for letting me share my room with you.  I can't wait to decorate this fall because last year I looked everywhere.  Hobby Lobby only had black and white chevron.  Now you should see School Girls Style new collections - Colorfully Classroom Decorand Chevron Chic. 
OMG she just posted Chevron Chic two days ago!!! I need it all!!  Hope you enjoyed visiting my room.  
Happy Summer to you,
Leah